For those of you who are new here – I’ve been documenting the process of remodeling our 1940’s Colonial home in coastal Connecticut into a space that’s modern, fresh and layered but still maintains its traditional roots. You can check out past week updates here: week one, week two, week three, week four, week five and week six.
Welcome to the final week of the One Room Challenge™, where we’ve spent the past six weeks completely renovating our guest bathroom from 80’s basic to a modern take on the old-school European hotel bath. This bathroom pairs with our guest room, so keeping a consistent thread from room to room was critical. To be completely honest, I wasn’t sure we’d complete this project in time because we bit off A LOT with this one (thank goodness for that extra week!).
During the course of this challenge, my husband and I took our bathroom down to the studs, laid new level subfloor, installed radiant in-floor heating, framed out the new tub, ran all new electrical and lighting, hung our first ceiling, installed cement board walls, installed our first tiled floor, completely tiled all four walls in the room, painted the ceiling and trimwork, grouted everything, hung crown moulding, installed all new lighting, installed the shower curtain track, and more. It was insanely busy and a very ambitious project for the two of us to tackle (plumbers handled all the pipes, rough in and fixture installation).
So, without further ado, let’s get on to the photos:


And a quick reminder of how far this bathroom has come:


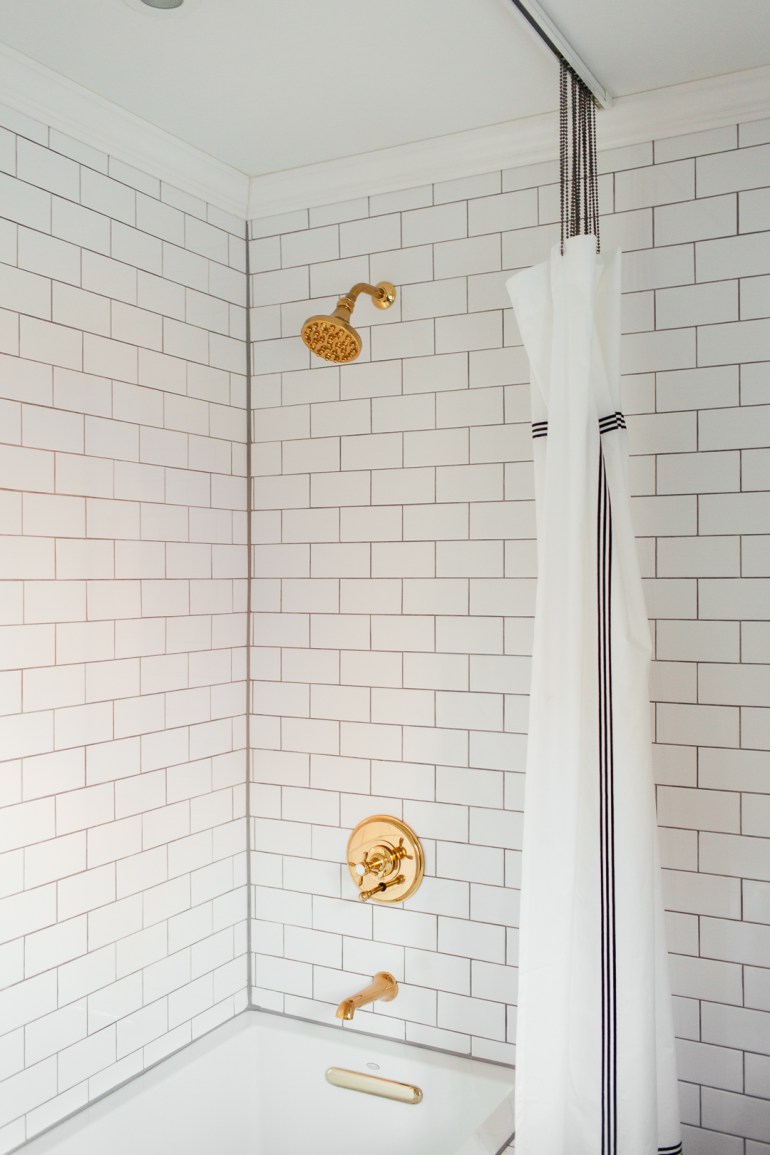
The tile is the star of the room. I knew that I wanted to use classic materials for the tiles, since they’re permanent fixtures that we never intend to change (and hope that buyers feel the same way if we ever choose to sell the house too). Starting with the floors, after a lot of debate, we opted for marble since it’s a nice upgrade and truly makes me happy. We also installed radiant coils, so these floors are nice and toasty (another upgrade). For the walls, I’m a huge fan of going big, so we used the basic subway tile that’s historically relevant to our home and applied to over all the walls. It was no doubt a lot more work but it completely elevates the space.


The tub that previously was in this bathroom was extremely shallow and was really non-functional for baths. After spending a lot of time at the Kohler showroom, we narrowed our choice to the Underscore soaking tub, since it’s great for baths but also comfortable to step into for showers and looks awesome. Since we took down the wall that closed in this shower, I was adamant about using a tub that didn’t require us to put walls back up to keep the space feeling nice and open.
The faucets were finds at the Restoration Hardware outlet that perfectly merge the clean, modern lines I love, with the vintage details like knobs labeled ‘Hot’ and ‘Cold’ that elevate the space and create a more custom feel. The brass hardware helps to bring some warmth into the room, which contrasts nicely with the all white subway tile.


The vanity was a last-minute decision when our first choice became out of stock and also allowed us to be opportunistic when we discovered we’d gained an extra few square feet of floor space. We swapped out the hardware for nice, heavy brass hardware from Rejuvenation that make this vanity look much more expensive and custom. I wasn’t sure how the stock marble countertop would look, since it can be hit or miss with pre-cut marble, but this countertop is actually a pretty gorgeous piece of stone with great movement and veining.


I’m a huge fan of having a lot of light sources in every room, and I make sure that as many of them as possible are on dimmers for instant ambiance. In here we added some extra lights including the pair of pendants flanking the mirror, the recessed light in the shower and relocated the overhead light so it was centered on the doorway. The pendants were super budget-friendly scores we found at Homesense but were in a shiny chrome. A few coats of matte black spray paint later and they totally fit in. The overhead light was a last minute swap (literally at 11P last night), where this CB2 light replaced a vintage find that we had sprayed black, but featured four more globes, which competed for your attention with the pendants. Using a simpler, lower key flushmount allows your focus to land on the pendants.


We added the crown moulding to keep the room cohesive with the rest of our house. It’s a nice traditional element that keeps this room from floating too far into the modern end of the spectrum. We gave all the trimwork a fresh coat of paint, including the windows and door, which went Onyx by Benjamin Moore for an instant dose of chic. We spray painted all the window hardware a matte black to blend in. I’ve been debating this paint treatment on the windows for a while now, and seeing it in this bathroom has cemented that I need to do it on our main floor too. The ceiling and trim are painted in Benjamin Moore Decorators White, as in the other spaces we’ve completed in this house.


The shower curtain track was a DIY inspired by Kristin Jackson at The Hunted Interior, where we didn’t want to rush ourselves into a glassed in tub (which I don’t love for baths and is pretty pricy), until we’d tried out this budget-friendly solution. Apologies that the shower curtain looks a bit droopy – we ran out of ball chain and of course weren’t able to secure more in time. The rug is a vintage find from eBay, as is the lion’s head towel ring (which also matches the one in our main floor bathroom).


All in all we definitely pushed ourselves to create a bathroom that we’re completely smitten with and made sure not to sacrifice the design or any details for the sake of completing this room on time. Taking a step back and looking at how this bathroom works hand in hand with the guest bedroom it accompanies, I couldn’t be happier with the shared elements (crown moulding, ceiling medallion paired with black light fixtures, brass accents and vintage details), but they also both definitely have their own personalities and identities, mainly represented in the use of all-over immersive walls in totally different materials and colours. In short, we’re smitten.
Sources:
Marble Hex Tile | Subway Tile | Grout | Bathtub | Vanity | Vanity Pulls | Mirror | Toilet | Faucet | Shower Head | Tub Spout and Control | Shower Curtain Track | Hand Towel | Flushmount Light | Ceiling Medallion
And don’t forget to check out all the other awesome reveals by other One Room Challenge participants here.

Oh it’s so wonderful!! I love everything…the tile, those pendants and the Venetian mirror…the vanity hardware. It’s fantastic. Having now done subway tile, I know exactly what a pain in the rear that is, so major kudos on staying the course and finishing a gorgeous room!! xx
Thank you, Laura! The tile definitely added quite a bit of effort to the project, but it totally makes the room 🙂 Loved your reveal!
I wish I could pick a favorite item but I can’t. There isn’t one thing I would change! It’s a gorgeous makeover! I knew you’d finish it! It’s absolutely beautiful! Great job!
Thank you so much!!
so chic!! the black and white palette is so strong and sophisticated … and the black framed windows totally blew me away. One item I particularly like is your shower curtain system. How clever and creative is that!! amazing photography and congrats on a breathtaking transformation!
Thanks Tim! I wasn’t entirely certain how the curtain would work out but the track has made the space SO much more open.
Bravo! Take a bow your bathroom is fantastic. What an amazing transformation. This has been such an inspiring round of the ORC. I really appreciated the extra week.
May you and your family have a wonderful Thanksgiving!
Thank you so much!
So beautiful Erin and I love the shower curtain you made. Congratulations!
Thank you! The curtain was definitely a big discussion point, but I’m so happy this solution allows for such an open space without the glass closing in the tub!
Love the vanity color with the honeycomb and subway tiles…looks great!
Thank you! I wasn’t exactly certain what tone the vanity would end up being (#onlineorderingproblems), but it’s so much better than I imagined!
Isn’t life grand when things work out better than expected? 🙂
I absolutely love everything about this plus having restored an old house am in awe of the time frame you did all this in – now get some sleep! Am I right 🙂
Every detail is perfect.
Thank you! That’s so appreciated. We worked around the clock to get it done, but it was absolutely worth it for the final result 🙂
The mirror framed by the globe lights makes me want to give you a high five! Seriously, the combo is so Art Deco cool. LOVE this space!
Ahh thank you!! (And thanks for the high five 🙂 )
This is the perfect mix of modern and glam. One of my favorite reveals! Great Job!!
Thank you so much!
That mirror and those pendants are just AMAZING! Such a beautiful and classic space.
Love this contemporary take on classic black and white! Just perfect bathroom! Congrats and Cheers to another room done!
Great job! I love that you tiled all the walls. It makes such an impact and really elevates the space. One of my favorites from the ORC!
well done! I love that you tiled to the ceiling and your lighting selection is brilliant. That ceiling mounted curtain track though…I used an Ikea version similar and I think I’ll have upgrade to this.
Love your lighting selection! And the hardware is making my heart pound faster! Great job.
I love this, it’s almost exactly what i want in my bath. I am obsessed with subway tile and old hotels.
thank you!
Hi! Love everything about this space and very similar to the look we are going for in our bathroom! I just wanted to check that the subway tile you linked from Floor & Decor is the exact tile used in this space. We purchased the same Kohler tub for our guest bath reno and I am looking for a white subway tile that will blend nicely with the tub. It looks perfect here! Thanks 🙂
Yes! This is the exact tile we used from Floor & Decor (https://www.flooranddecor.com/tile-decoratives/bright-white-ice-subway-ceramic-wall-tile-914100887.html#start=1), where it’s the brightest white subway tile I’ve been able to track down 🙂
Beautiful bathroom! What is the vanity color and who makes it?????