

If you’re new around here, a year and a half ago my husband and I purchased our first house: a 1940’s Colonial located in a very cute coastal Connecticut town. We’ve been tackling remodeling the house room by room, where we’re always looking for ways to add equal parts function and character into our house. Catch up on Week One, Week Two and Week Three.
This week was a huge one. We accomplished a ton: laying the radiant coils for in-floor heating, pouring self-leveling concrete, tiling the floors and ordering all the remaining items on our list (flushmount lights, a sconce, vanity hardware, switches, recessed lights, toilet paper holder, and more).
Let’s dig in.
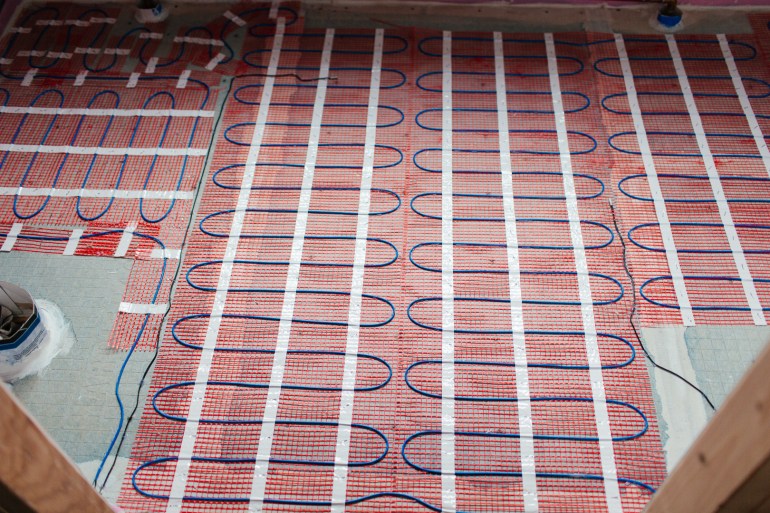
Laid the radiant coils
We love having radiant in-floor heating in our guest bathroom and knew that including the heating in this bathroom was a must (both for our own benefit and for resale value). We used the same system as last time and it went more swiftly this time since we’d learned some tips and tricks:
-
- Plan a channel for the wires to enter the wall for the radiant controller. By this I mean, drill a hole into the wall right at the level of the cement board for your wires to enter the wall where your temperature controller will live to avoid any awkward bumps in the floor or wall. Once you pour your self-leveling compound this channel will completely disappear.
-
- Use a staple gun to secure all the wires to the floor and then go back with a hot glue gun to make sure everything is very secured. What you absolutely do not want is any of the radiant coils to float in the self-leveling compound, because otherwise you’ll have uneven heat dispersion and cold spots on your floors.
-
- Make sure your heating coils make it to all the places where you might be standing, especially in front of the vanity, the toilet, entryway and the shower.
-
- Install two temperature sensors in case one of them might fail, where it’s a lot easier to open up your wall and attach the alternate sensor if things don’t work quite right than it is to remove your tiles and track down the original sensor.
-
- Test your coils for electrical resistance at every step in the process so you catch issues if they happen as quickly as possible. We use this multimeter, it’s an essential for any electrical home DIY and is super inexpesnive.
-
- We opted not to use a wifi enabled controller because it didn’t feel like it was worth the cost, given that radiant floors take some time to heat up, so they are best left on a daily schedule than turned on on-demand. We’ve set ours to turn on at 5:30A so the floors are semi-warm when my husband wakes up and then reach peak temperature (82 degrees) at 7A, when I’m typically hopping in the shower. Yeah, that makes me sound spoiled ha.




Poured self-leveling compound
We used spare cardboard to create dams around the toilet flange and radiator pipes, and then ran a bead of plumbing caulk to ensure they were watertight. We also dammed the threshold area with a 2×4 to keep the compound from escaping (with a bead of caulk on the front).
And then, we mixed up the self-leveling compound and dumped it into the room in buckets, starting with the lowest spots first. The self-leveling compound solved for two problems at once: creating a flat surface over the coils and creating a level plane in the room, where we had a slight slope. You pour as much of the compound as needed to fully cover the highest spots. It looked very soupy and ominous at night but by the morning had cured to a fully-flat plane. It was magical.
We used this compound and mixed up two buckets at a time, and once we got started, I’d mix up new batches while my husband spread it over the floor.
Tiled the floors
This was our second floor tiling experience and we went into it a lot more prepared this time around. This was also our first time tiling a herringbone pattern and it took some google searches to figure out where to start, but once we did it was smooth sailing. This is the 3×9 Carrera Bianca Marble tile that we used.


Some things we have learned:
-
- When you’re using a marble or natural tile that has a great range of variance, make sure to pick one tile from each box for a section and then go back and choose another tile per box for the next section. Tiles in the same box tend to be in the same colour family and can cluster together if you aren’t careful.
-
- Make all your cuts before you start tiling. We did not do this and regretted it. Because of some scheduling constraints, we wanted to get the floors started as quickly as possible and focused on the full tiles first. We ended up wasting a good deal of time scraping up thinset that had dried around the edges, where we started at the top of the room and worked through the full tiles and then came back to the edges. This seemed efficient up front, but ended up being a big time waste on the back. When we tile the shower floor, in the same herrigbone pattern, we intend to make all the cuts first and then install the full floor at once.
-
- Use a leveling system. It may seem like a lot of extra work over the simple spacers, but getting the top of your tiles level is critical. Not only can your surface be a bit off, but when you’re dealing with a natural tile, the depth of your tiles can vary ever so slightly. Plus, add in a varying thickness as you lay down thinset and there are a lot of variables that should be neutralized. You don’t want lippage in your tiles, trust me. We used this two part leveling system (part one, part two) and couldn’t be more happy with it.
-
- Set up a laser level to keep your lines straight. You don’t want your tiles veering off center, so the laser helps to keep you aligned. We recently picked up this laser level and it’s been a huge upgrade over our super mini one.
-
- When doing a herringbone pattern, you will struggle with where to start the pattern. There’s some math involved in determining the center of the pattern: you need to strike a line at dead center on the room, then measure half the tile width to the right and this is your starting line for your “V”. The “V” is where both corners intersect the line. Once you get the pattern started, you’re all set.
Finalized Lighting
I noted last week that the sconce I had intended to order and had looked to be in-stock a few weeks ago was no longer in stock, so I went back to the drawing board.
I have to give an enormous thank you to all my design friends who sent over so many helpful suggestions: Claire, Sarah, Natalie, Kate, and Ashley, you guys are the best. It’s amazing that Instagram has allowed for these connections to happen cross-country and even internationally. Truly, it’s incredible.
Getting back to the issue at hand, let me explain the complex scenario that landed me to the final solution: we’re installing a 62″ double vanity that takes up nearly the entire wall (63″), and with the stunning Metrie panel moulding trim that we’re adding directly on the wall, we’ll have an opening above the vanity of only 51″ wide. Which meant that I had four options:
1. Source a very narrow pair of mirrors, one to sit over each sink. The trouble here, is that a lot of mirrors that are narrow aren’t tall. I love a tall mirror and how it elongates the space, so this was becoming problematic. I popped into Rejuvenation and one of the sales staff helped me to find a mirror that was similar to the one I actually wanted to use in the space. The solution was an unconventional choice, but when I went back home and measured, they had given me the internal measurements, not the external, so it wouldn’t have laid flat in the panel opening.
2. Source a wide mirror to be shared between the two sinks. There are two challenges with this option: the first is that I hate the idea of standing at the sink and maybe not being able to look in the mirror because it isn’t wide enough to reach to the edge of the sink. The second issue, is where does the light fixture go?
3. Suspend mirrors. My husband nixed this one immediately, but I do think it could have been quite cool to suspend the mirrors in front of the paneling (either vertically from the ceiling or just bumped them out in front of the panel moulding, mounted on the wall). This solution could have been cool in a more modern style home (I’ve seen it done in front of windows and it looks awesome). But, the other challenge is also that given the placement of the vanity in the room, you would have frequently seen the side profile of the mirrors, which would have made for a bizarre view, in my opinion.
4. Install a custom mirror to fill the entire opening and mount a sconce directly on the mirror. This one I was the most hesitant about at first since it feels so distinctly traditional. I’ve always loved the personality a mirror can bring to the space and this solution was completely devoid of that personality. But, the more I thought about it and the more examples I pulled, the more I came to see the upside to this solution. The first upside being that you get an enormous mirror, which will really open up this space visually. It will also allow the beautiful trimwork to really shine and will feel so custom. I also love the idea of mounting a cool, modern light fixture in a way that is more traditional. This is the approach I’ve used throughout the house with our ceiling medallions + modern fixture combinations, so I’ve come to really, really love this solution.
Here are some examples:


So, we’re going for it. I got quotes for custom mirrors to fit the space and was shocked at how reasonable they were (even in our super expensive area). Most quotes came in at $350 – $450, which is in the same range of what I would have spent on two mirrors (if not a bit less).
Sometimes the magic in design comes from the creative solutions to tricky problems. While this isn’t where I thought I’d land up, it is somewhere I’m very excited to be headed.
And now for the actual lighting selection.
This is the sconce I’d originally planned on using, mounted between the two sinks.
I was limited to replacements that were in-stock only and contemplated so many different options. We very nearly purchased this one, but there was something about the aesthetic that screamed too mid-century modern for my traditional Colonial house. Finally, we landed on this one, mounted near the top of the mirror:

After some discussion, my husband and I agreed that a statement sconce that was up out of our eyesight would make the vanity the most functional. I’m excited to see this sconce in place. I also sourced a less expensive version of this sconce, but the brass detailing on this one really tied the room together (and mirrors the black with brass details on the pendants in our guest bathroom).


Some of the alternate eye-level mounted sconces we considered were this, this, and this.
This week will be tiling the shower and installing all our beautiful Metrie trimwork. We’re racing against the clock in order to have enough time for a glass shower door and custom mirror cut and installed before Week Six reveal photos. Oh, and we need to paint the vanity, paint all the trimwork, have the plumbers install the fixtures and so much more. I anticipate a lot of late nights in the coming two weeks. We have a to-do list with a mere 30 items on it, broken down by day, so we can just scrape by into Week Six (hopefully). Please send help. But really.
You can check out all the other participants on the official One Room Challenge™ site here.

