I’ve never had a more requested blog topic before. Like many of you, I wasn’t totally sure how much a kitchen renovation would cost before we 100% wrapped this one up, so I understand the curiosity. My husband and I were chatting about this recently, and I think we figured out why there’s so little common knowledge around kitchen budgets: we’re all so much more likely to renovate a bathroom, but you may realistically only completely renovate one to two kitchens in your lifetime. Plus, the budget for kitchens can differ vastly across the spectrum based on a number of factors.
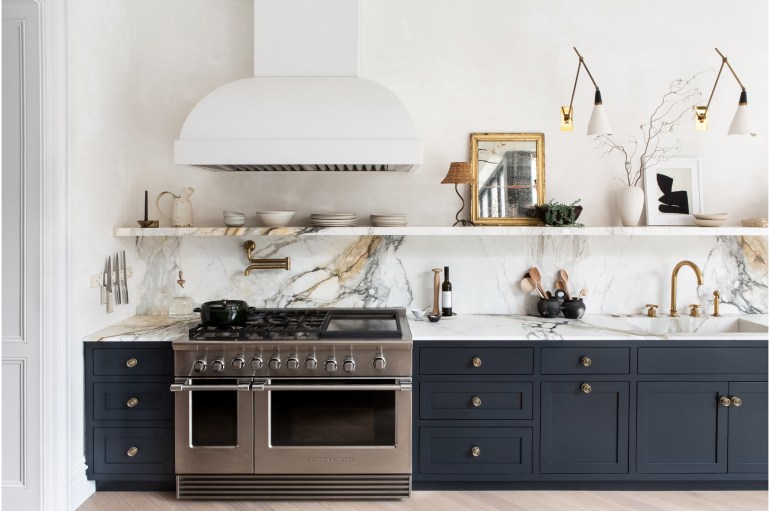
We spent at least a year debating our countertop material for our new kitchen (as you do), where it was between quartz, quartzite, and marble. I’ll dig in to our argument for each now and what were the final deciding factors in choosing to move forward with marble.
I want to stress that this is a personal and lifestyle choice. None of these are bad options by any means, it’s all about what you prioritize for your home and needs.
If you’re new around here, three years ago my husband and I purchased our first house: a 1940’s Colonial located in a very cute coastal Connecticut town. We’ve been tackling remodeling the house room by room, where we’re always looking for ways to add equal parts function and character into our house.
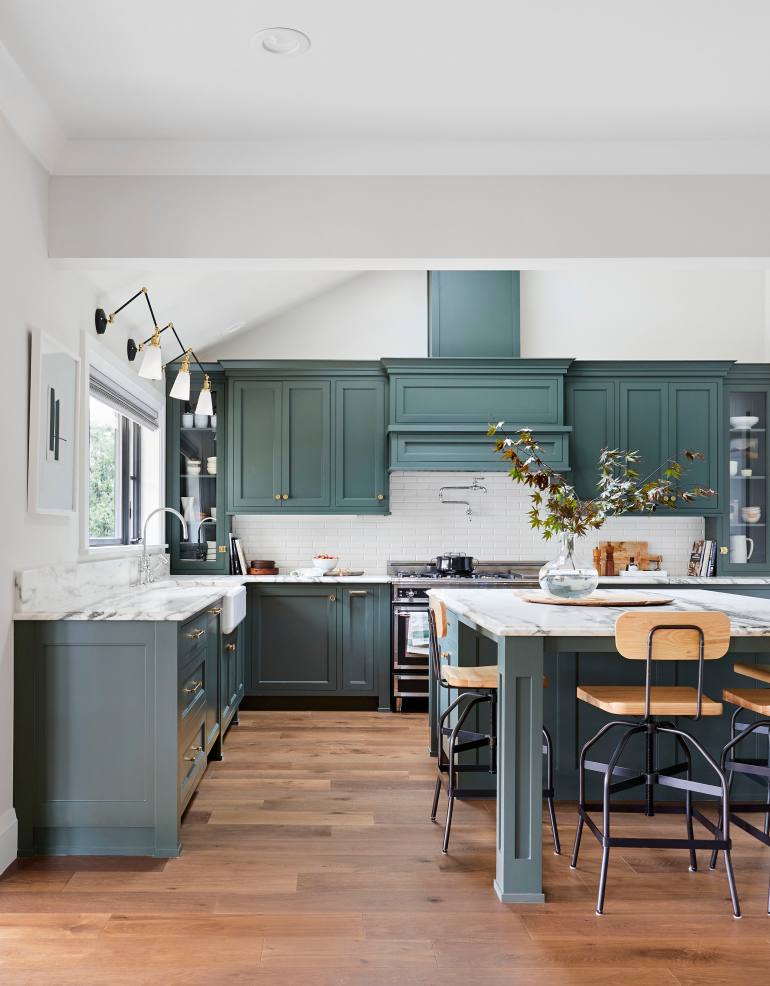
Today’s the day! After years of dreaming of transforming our kitchen from a dark, brown-all-over cave to a light-filled warm, timeless kitchen, we’ve finally brought our dreams to life. Five weeks ago, we started with an empty space – our contractor had gutted our kitchen, opened up some walls, redone the electrical and plumbing, and laid and finished the hardwoods – setting the stage for us to install the kitchen on our own. This was our first kitchen renovation and we spent the entire season of the One Room Challenge running at 100% in order to complete this kitchen during our nights and weekends. We’re so very tired, but also so proud of where we ended up!
Before I jump into the photos you’ve been waiting for, I wanted to give a huge thank you to everyone who made this massive project happen: Linda, the One Room Challenge founder and organizer who masterfully organized this entire challenge, the generous brand sponsors who helped to bring our vision to life (getting to work with such incredible brands have created an even more beautiful kitchen than we could have done otherwise), my husband, Cory, who has been working around the clock with me to get this space done (this meant giving up every one of his weekends and evenings over the past 5-weeks in order to get this done, making over 30 trips to Home Depot, and staying up until 3A to install our faucets), and all of you, who kept me motivated to keep going, even after weeks of working late into the night.
Before we jump into the photos, I’d like to take a moment to reflect on where we started.
The before
As I’ve mentioned before, our kitchen before was fine but in no way met its potential. These images make it look much brighter than it truly was (I couldn’t help myself when shooting the before photos). The finishes and layout just weren’t working for us, so we donated all the cabinetry, appliances, and countertops and started from scratch.
The biggest changes
In reflecting on this kitchen, there are three major changes that we made that completely transformed this space:
We expanded the opening between the kitchen and the dining room from 3 feet wide to over 9 feet in width. That allowed for a huge increase in both the sunlight reaching the kitchen, and in connecting the kitchen to the rest of our main floor (without being fully open concept).
We pushed one section of one of our walls (where the fridge is above) backwards by 16” into our front entry, which allowed us to sink a full height wall of cabinetry and our fridge into this wall, which allowed for the walkways required to add a big (but narrow) island down the center of the kitchen.
While in the construction phase, we pivoted and decided to add a new window where our former pantry lived just outside the kitchen, and to add a small built-in mudroom bench with shoe storage. The new natural light from this window brings sunlight to a former dark spot in our house, and also allows for us to see out to our frequently used flagstone patio. As a bonus, out of the window, during the evenings we get to see the string lights that hang over our patio. It’s magical.
If you’re new around here, three years ago my husband and I purchased our first house: a 1940’s Colonial located in a very cute coastal Connecticut town. We’ve been tackling remodeling the house room by room, where we’re always looking for ways to add equal parts function and character into our house.
I can’t believe how fast time has been going by, nor that we’re already at Week Four. This is the week where we always start to panic, and this season is no exception.
We made a ton of progress this week, but we’re still trying to get a few big items scheduled, delivered, and installed. Our biggest hold-ups right now include waiting for our countertops to be installed, waiting for our tile to be delivered, and waiting on a missing custom cabinet unit to arrive. All these items mean we can’t install our crown moulding, our upper cabinets (including the vent hood), lighting, or plumbing. I have a feeling I’m going to be begging all my friends to help us out next weekend with getting through this outstanding list of items in order to hit the Week Six reveal deadline.
If you’re new around here, three years ago my husband and I purchased our first house: a 1940’s Colonial located in a very cute coastal Connecticut town. We’ve been tackling remodeling the house room by room, where we’re always looking for ways to add equal parts function and character into our house.
Somehow, it’s now Week Three of the One Room Challenge and next month’s deadline is sneaking up really fast. As promised, this week, I’m taking you through our design plan, including details on our appliances, fixtures, lighting, tile, countertops, and more. First off, let’s start with our progress in the most recent week.
Where We’re At
Cabinetry
If you’ve been following along on Instagram, you know that we’ve been racing to getting our cabinetry installed to a point where we can schedule countertop templating.
First, we installed all our perimeter cabinetry from CliqStudios and within a few hours the room became transformed into a kitchen. We did, however, discover at this point that our panel-ready dishwasher that we’ve been storing in our garage for months is too deep to sit flush with our cabinetry. This prompted some very late-night research and ordering of a replacement dishwasher (this one), which is more than shallow enough to fit seamlessly. Fortunately, it was delivered at the start of this week and fits like a glove. (Note to future self the next time I renovate a kitchen, not all appliance dimensions are standard!)
Then, we moved on to installing our island. As you saw in last week’s cabinetry plans, we opted for half an island of cabinetry and a beverage fridge, and the other side is an open tabletop with stools for seating on two sides. We had been a bit worried that the island walkways wouldn’t be large enough (even though I’ve been measuring every kitchen I’ve been in for the past six months to see how our distance would compare, thanks friends for putting up with me!), but once we got the island cabinetry in, it became clear that our walkways were going to feel just right for the space. Sure, we’d love a wider kitchen with expansive walkways, but the reality is that this kitchen’s footprint is finite and it’s the absolute best we could have done for the space.
If you’re new around here, three years ago my husband and I purchased our first house: a 1940’s Colonial located in a very cute coastal Connecticut town. We’ve been tackling remodeling the house room by room, where we’re always looking for ways to add equal parts function and character into our house.
It’s week two of the One Room Challenge, and I have a lot to share. Today, I’m revealing the floorplan updates we’re making to the kitchen, construction photos, and the cabinetry plan for the space. While I had every intention of sharing the full design plan, I’m still trying to finalize some of the details, including cabinetry hardware, an art piece, lighting, fabric, and counter stools so I’m sticking to the cabinetry today (which is meaty in and of itself!). This is the biggest project we’ve ever tackled and the first time we’ve worked with a contractor, so we had to shift our mindset in how we approached the project.
The Floorplan
First up, the floorplan. Here’s our original kitchen, where we always found the peninsula to break up the flow of our kitchen. Some positives about our original kitchen:
Lots of storage
A sizable footprint
The sink/fridge/range working triangle is pretty good
Lots of counter space
But, on the not so positive side:
The peninsula closes in the kitchen
The kitchen wasn’t designed to hide clutter (my biggest pet peeve) where we end up with lots of appliances and stuff on the counter
The kitchen feels dark and closed in from the rest of the main floor
You can barely open the trash (and definitely not the recycling) when the dishwasher is open (makes cleaning up after every meal a HUGE pain)
When we entertain, everyone ends up clustering in the doorway between the kitchen and dining room and don’t end up utilizing the rest of the main floor space
So, after debating a lot of different floorplans (see here), here’s where we’ve ended up:
We’ve been noodling on how to best tackle our kitchen for 2.5 years now, and we’ve landed on three potential floorplans (a week ago when I first took a stab at writing this post it was one, but alas, I’ve reopened a few of our previous ideas…). This is a good reminder that sometimes you have to live with your house for a while to see what makes the most sense, and sometimes you have to consult the masses because you’ve hit a wall, ha!
Backing up, let me introduce you to our kitchen in it’s current state:
And those wide-angle listing shots (we made a few changes):
A few things that I need to address before we proceed:
Yes, our kitchen was renovated about a decade ago and for the most part, it’s a reasonably functional kitchen. The appliances have served us well, and while we don’t plan to reuse them, we will find them a good home.
While this kitchen has been updated, it 100% does not align with the style of our house. It’s DARK in here. There’s no reference in the design to this being a 1940’s Colonial. It’s just a mid 2000’s bachelor kitchen.
Before you tell me we ought to paint all the cabinetry… yes, I know it’s a possibility, but for two reasons we probably won’t. The first being that these cabinets are not good quality. They’re an unfortunate laminate/MDF situation. If they were wood, yes we would keep them, but they genuinely are not good quality. The second reason being that the amount of dirt that accumulates in those ridges in the front panel of the doors is next level. These doors are impossible to really clean, and it drives us insane.
We’re going to be tackling renovating our kitchen this summer, so I’m deep in the research phase right now and am trying to learn as much as possible about how to design a super functional, beautiful, and on-budget kitchen. A few weeks ago, I asked on Instagram about what you all had learned from past kitchen renovations, and received so much incredible advice. Since the feedback was so immensely helpful, I’ve assembled it all by category below. If you have any additional feedback to add, please share it in the comments! Let’s dig in:
Overhead Lights: Think about where lights are placed overhead to ensure that when you’re working at the countertops or at the sink that the light is in front of you and not behind you to avoid shadows being cast onto the space in front of you.
Dimmers: Make sure all your lights are dimmable, so you can avoid being blasted by super bright light. This is great advice for every room in your house.
Under-counter lighting: Account for dimmable under-counter lighting, it’s very helpful. Also, make sure if you’re working with a custom cabinetmaker that the bottom of the cabinetry allows for the lighting to be flush with the cabinetry.
Outlets: Don’t forget about your outlets! The placement and orientation (horizontal can be a good idea). Also, make sure to source beautiful outlets and covers to avoid them ruining a beautiful backsplash. Think about where you’re going to need power within your kitchen, so you can keep your small appliances in a convenient place in the space.
2. Storage
Drawers: You guys are ALL about the drawers, and I couldn’t agree more! Drawers can be a lot easier to organize and access than your standard cabinet doors with shelves. Leverage deep drawers for pots and pans, and medium-depth drawers for plates and bowls. Add drawers under your stovetop for cookie sheets, muffin trays, and the like.
Pantry: If you have a deep pantry, add drawers so you can access everything that gets pushed to the very back. This really allows you to make the most of the space. You can never have too big a pantry, so make sure to allocate a good amount of space for food storage.
Non-Cooking Storage: Consider how you can find a home in your kitchen for other items like large serving pieces, cookbooks, and dog treats.
Appliance Garage: Nobody wants to look at lots of clutter in their kitchen, so think about how you can build in enclosed storage for your small appliances like toasters, microwaves, blenders and coffee-makers. A coffee bar that’s enclosed behind doors is a nice way to keep all your morning coffee items contained and out of sight, especially if you continue your countertop into this cabinet for easy cleaning.
Recycling and Trash: Don’t forget about enough space for recycling and trash, if you have extra space, it doesn’t hurt to make room for larger trash and recycling bins.
Cutting Board: Consider a slide out cutting board that looks like a drawer with a hole for trash for easier cooking prep.
Junk Drawer: Plan for a junk drawer. As much as you don’t want to have one, you indefinitely will end up with one.
It’s amazing how complex the storage can get behind cabinet doors, some of my favourite kitchen accounts to follow for storage inspiration on Instagram are Humphrey Munson and Studio Dearborn.
One of the biggest themes I heard was that it can be hard when you’re in the middle of an expensive project like a kitchen renovation to splurge on some big ticket items, but that a lot of you regretted not splurging on what you really wanted from the start. The lesson: don’t compromise on what really matters to you, despite it sometimes being the more expensive option, since you can’t easily go back and change your mind once it’s been installed. The items you wish you’d spent more on:
Larger 36″ ranges
A nicer backsplash, either one slab of stone or nicer tile
Porcelain sinks
Higher-quality cabinetry
Also, make sure the high cost of the project doesn’t scare you away from taking some design risks.
And one area not to splurge: solid maple interiors on your cabinetry are an expensive splurge that rarely gets seen and doesn’t make much of a difference in the scheme of things.
Trim: Simpler trimwork and profiles will keep from becoming dust magnets.
Paint: Professionally painted woodwork is way more durable in the long-term. Make sure you use paint that’s graded for cabinetry.
5. Appliances
Fridges: Measure for the exact fridge depth so it doesn’t stick out. Opt for counter-depth fridges so they don’t take up as much real estate in the kitchen (this is one of my biggest pet peeves and is currently an issue in our kitchen).
Panel Ready: For a cleaner look, opt for panel ready appliances (the standard in Europe, but are becoming more popular here), however, be careful that the weight of the panel itself is on spec for the appliance, so as not to impact the mechanics of the appliance. We’re hoping to use an integrated, panel-ready fridge in our kitchen renovation because I just don’t typically love how much visual attention the standard fridge often commands in a space.
Range Hood: Don’t do a combination microwave and range hood, the ventilation is never as good (also an issue in our current and past kitchen), and it’s a missed opportunity to make a statement with your hood. We’re going to be hiding our microwave away since we rarely use it, and have no desire to look at it every time we’re in the kitchen. Make sure the ventilation on your hood vents outside and that your ventilation is powerful enough for the room.
Dishwashers: Stainless Steel fronts on dishwashers will show water drops, so be careful about the material you choose (Another issue in our current kitchen).
Countertop Material: There was a lot of conflicting opinions on this one. Some people wish they hadn’t gone with quartz because it’s isn’t actually as indestructible as people say it is and can scratch and stain. But, lots of people love their quartz counters and are happy they went with them. Some people regret doing marble because it’s high maintenance, while others are happy with how it patinas and ages. One common sentiment is that a busy or loud countertop choice will boss your kitchen around visually, so it might not be the best place to go bold.
Tiling: Take the backsplash all the way up to the ceiling if you’re tiling. Don’t feel rushed to install your appliances before your backsplash in the event that you want to run your backspash behind the range and need access.
Floors: If you’re doing tile on your kitchen floors, be aware that lighter floors will show a lot of dirt and wear quickly.
Sight Lines: Make sure there are clear views to other rooms for watching kids and entertaining
Adjacent Rooms: Consider continuing the same cabinetry into other adjacent spaces, like the mudroom and laundry room for a more cohesive look and more functional storage.
Size: Ensure the space is large enough, on paper might look good, but the room starts to fill up fast with cabinetry and appliances.
Islands: Go with a larger island if you can and really maximize the storage within the island.
8. Sinks & faucets
Sink: Go with a big, deep sink if you have the space for it.
Faucet: For ease of use, a single lever faucet with an integrated sprayer is the way to go.
And some general advice: trust your instincts, and don’t let poor quality work slide. Know that it will take longer than you expect. And don’t cut corners, at the end of the day your kitchen is a workspace that is one of the most hard-working rooms in your home, so make sure everything is as high-quality as possible.